One question I hear often from beginning sculptors is, “How do I sculpt eyes?” My first response is usually, “The same way you sculpt hair, noses, hands, feet, and everything else. Observe the form and make that.” After that less-than-helpful response, here are some of my approaches and preferred references.
There are a few key points, which I will illustrate, but are worth listing as reminders. I actually use this as mental checklist when I sculpting myself.
- There is more than one technique for sculpting eyes, and your style and the scale of the sculpture will influence which one you think it most appropriate. I use several techniques, but I am generally consistent within a certain scale, just changing when larger scale allows me to capture more realism with my clumsy hands.
- The most important form of the eye is the edge that catches the light. It doesn’t really matter what forms you create as much as how they catch the light.
- With an upright pose with standard lighting, the upper lid as it meets the eye lash is the most important form for defining the overall shape of the eye.
- The form of the bottom eye lid is optional. But if you create it, the upper edge of the lower edge is the most important facet as it catches the light.
- The crease under the lower lid is best left minimized or eliminated. In general, creases and folds, even if observed tend to make the sculpture look older than the model. I’m not sure why, but it does.
- The eyeball is a sphere insert into the socket of the skull. That means it protrudes from the plane of the face.
- The upper lid protrudes further than the lower lid.
Classical Approaches to Eyes
Painted Form

Personally, I would never use this approach, but it is common in early Egyptian and Greek sculptures. It is useful for using the same symbols to represent the eye as are done in contemporaneous drawing and painting, but I think it does a disservice to what you can get from actual light and it certainly is neither realistic nor characteristic of a portrait. at its worst, it looks like a face drawn with a marker on a balloon. At it’s best, it can still be beautiful. The difference is usually how convincing the form is under the painting.
Inlaid Hollow


A more realistic version of the Painted Form, particularly in classical bronze, the entire eye is hollowed out and the eyeball is inlaid with ivory and the iris is inlaid with rare minerals like lapis lazuli. This creates a much more realistic coloring. However, the brightness of ivory eyes against a dark patina bronze can be a bit unnerving. It tends to look more natural on marble sculpture, which were often painting with pigment to the color of skin and fabric from head to toe. Again, the colors of the paint and the stylization of the eye are more a form to present a painted surface than letting the light do the work for you.
Since many classical sculptures eyes were looted for their original rare materials, it is very common to see classical art without any inlay, and jus the hollow. Like classical sculpture often being found without limbs and heads intact after hundreds of years of neglect and//or earthquakes, it has become a cliche to actually leave the eyes intentionally hollowed to demonstrate a more antique style. I actually use this technique often depending on the size of the sculpture. For small sized portraits, the level of detail to capture the iris and the white of the eye may be finicky or just unnecessary. However, the larger the eyes, the more vacant and haunted this style will look. This may be the intent and makes for a useful emotional tool.

Stylized Edges

Particularly the eyebrow, the bridge of the nose, and the shape of the eye. This style has more natural shapes, but the edges tend tend to be carved with more acute edges, catching light directly to create direct highlights or cast shadows. These stylized edge can be used in an combination of techniques sculpting the pupils and irises below.
In my own work
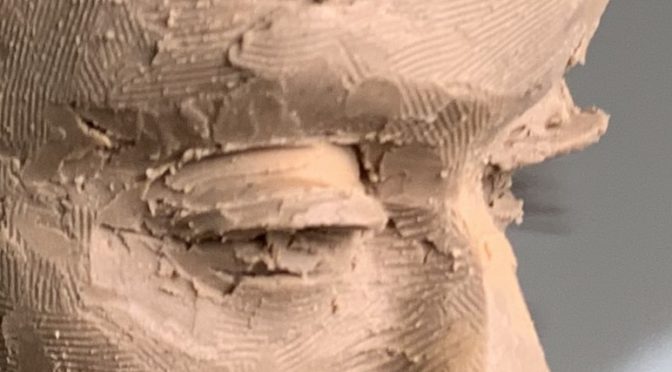
Particularly at the scale that I typically work at 1:3 or 1:2, I like to create hard edges to cast deeper shadows. In the WIP sculpture below, I have deliberately sculpted long eye lashes to catch the light and cast a strong shadow.


Blank Eyes

The form around the eyes are modeled with realistic detail, including the shape of the upper and lower lid. However there is no distinction between the white of the eye, the eye, and the pupil. This is very common, and also one of my preferred techniques on smaller sculptures. From a pure form view, it is all the most anatomically correct version of the eye, as there is no surface delineation between the coloration of the iris or the pupil. In classical sculptures, some of these blank eyes may or may not have been painted.
Scribed Iris

The next level of detail includes a realistic modeled eye with a scribed iris. This is starting to let the light do the work for you. In this case, many of these eyes are able to show more subtle expression by showing the direction of the pupil facing. Typically, the pupil is not also scribed as that tends to make the eye look a bit creepy. Catching light all the way around the pupil is jarring. It is worth noting that rarely is the entire iris visible, except when the expression is surprise or wide-eyed horror. Scribing the entire iris in a stylized fashion tends to undermine the realism.

Carved (or Extruded) Highlight
My personal favorite, and my go-to method for portraiture if the scale allows is it to 1) carve the eye socket, 2) model and insert the eye ball (when using additive materials like clay), 3) Overlap with the upper lid, extruding the eye lashes to arch the light. 4) Support with the lower lid, carving the top edge to catch the light, 5) Scribe the iris, 6) Carve the pupil, leaving a highlight. I find this to be the most ‘sculptural’ approach letting the form do the work for you and creating an eye that appears ‘believable’.

Depending on the artist, this carved pupil may be stylized into the shape of a heart or a ‘Pac Man’.


In my own work
This is my preferred technique for life-size and larger work.


In other artists
This sculptor is roughing the irises to indicate the striation of color, carving the pupil leaving a highlight.

This sculptor carved out the iris completely, leaving only the negative space for the iris to catch the highlight. It is worth noting how voluminous the upper and lower eyelids are, really demonstrating how they wrap around the sphere of the eye ball.

Drilled Double Pupil
A version of the Carved Highlight is the drilled double pupil. With this technique, the sculpture actually used a drill to create two shallow holes, slightly overlapping, side by side. Personally, I don’t like this style, as the circular drills look artificial and the resulting highlight tends to be smaller than an actual highly, with a sharp edge. As there are no straight lines in the human body, there are also no perfect circles.

So, which technique do you prefer and why? Have you seen a style that I don’t describe here? Please share!